Portals Web Api - (Part 1)
Portals Web Api
Portals Web API has been a feature every Portals person has been asking to the Microsoft team to be developed, and finally, it has some light on it. The feature is still on preview and the docs are on a pre-release state, so this is likely to be changed, however, we can play with it and that’s awesome.
What is this post about?
I will be talking about how to create the Portals Web API and we will perform Create and Update, and we will discover what happens if we perform some errors.
At the same time, I will be giving you some tips for the Portals Cache and one for the AdBlock.
Start point
I have been playing with Portals since January 2018, that was the main point since I started a project that was highly involving Portals and, for that time, it was quite limited so we had to do some “patches” in order to solve some problems the API could have solved instantly.
This was mad since, at that point, I didn’t have the same knowledge I have right now, just, for instance, we started doing these “HTTP GETs” with OData Entity Endpoints (NOT RECOMMENDED AT ALL), then we moved to the FetchXML style (probably I will put a post later on about it). But the worst for me was to update or trigger things on the background.
If you have worked with Portals before, probably you feel identified with my feelings at that time.
And then, there is another common problem, Portals Cache! Have you had problems with the Portals Cache ever? I am sure about that, and I am sure you have your favourite browser with your …powerappsportals.com/_services/about to refresh the Cache every time you perform some code change.
Just in case you have some problems with it I will give you some tips, even this post was not supposed to be for that but it is Black Friday, so, why not?

- The Browser Cache and the Portals Cache are different.
- The Portals Cache can be manually refreshed from …powerappsportals.com/_services/about
- You CAN’T refresh others people Portals Cache.
- PPortals Cache is refreshed every 15 minutes and you CAN’T set it less or more (at the moment of this writing)
And here THE tip.
- The Portals Cache can be refreshed if you Submit an Entity Form.
That’s true if you perform anything and you submit an entity form, your page will reload, and with it, the Portals Cache. That was the tip we took from Microsoft and we took with us at some point.
So well, why I am so stubborn with all this Portals Cache blah blah blah? Because the Portals Web Api I am going to explain to you about, doesn’t refresh it, so you won’t be seeing the changes in real life unless you have a FetchXML and retrieve those changes. (That´s what we are going to do).
Before going deep into all the details I will leave here the docs about how to create a new Power Apps Portals, it’s always good to have it next to you:
Create your PortalPortals Web Api
First of all, let’s go to the docs where everything is explained and probably you are going to learn the same as here but in a boring way and with no GIFs.
Portals Web Api OverviewNice, first of all, you should have your Portals updated. Why? Well, the first item of the docs is this, I am copying it as it is: “Your portal version must be 9.2.6.41 or later for this feature to work.” And the second? Well, something we knew, this is in Preview.
From this point on, we will configure finally the Portals Web Api, now, it comes the good stuff.

FIRST STEP
Just to let you know before starting, I created a contact record with the Administrator web role to test all of this stuff and do the Portals Cache refresh.
Let’s go to the Site Settings of your Portal.
Here let’s enable the Web API for our Entity(table if we use the new terminology). I will go with the Account Table so we can check it and we can have some examples of how I did this. To create the API for an account we will create two site settings:
- For enabling the Portals Entity Api
- Name: Webapi/account/enabled
- Value: True
- For enabling the fields of the table that could be updated.
- Name: Webapi/account/fields
- Value: address1_city,description
🔥 Just a quick stop here, notice that this latest item, you can set the fields you want to update. If you want all the fields in that API you can set * and that’s it. We will go with these two fields, so I can show you what happens if I remove one of these in the site settings and we perform an update or create. Let’s keep the mystery for the final.

SECOND STEP
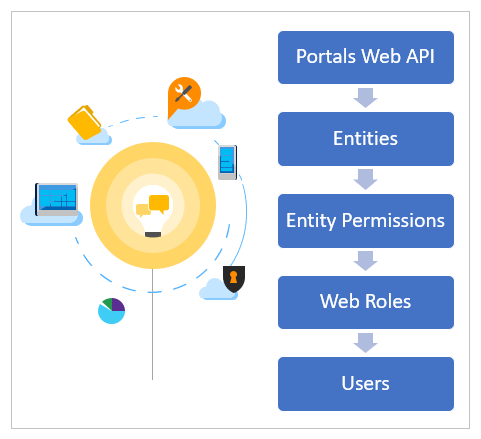
You will need to create Entity Permissions for that table you want to modify. Here, we need to set permissions to the Account table, so let’s do that. As it is an example, I will put the scope to the organization, it is highly likely you will need to set another one, but who knows.
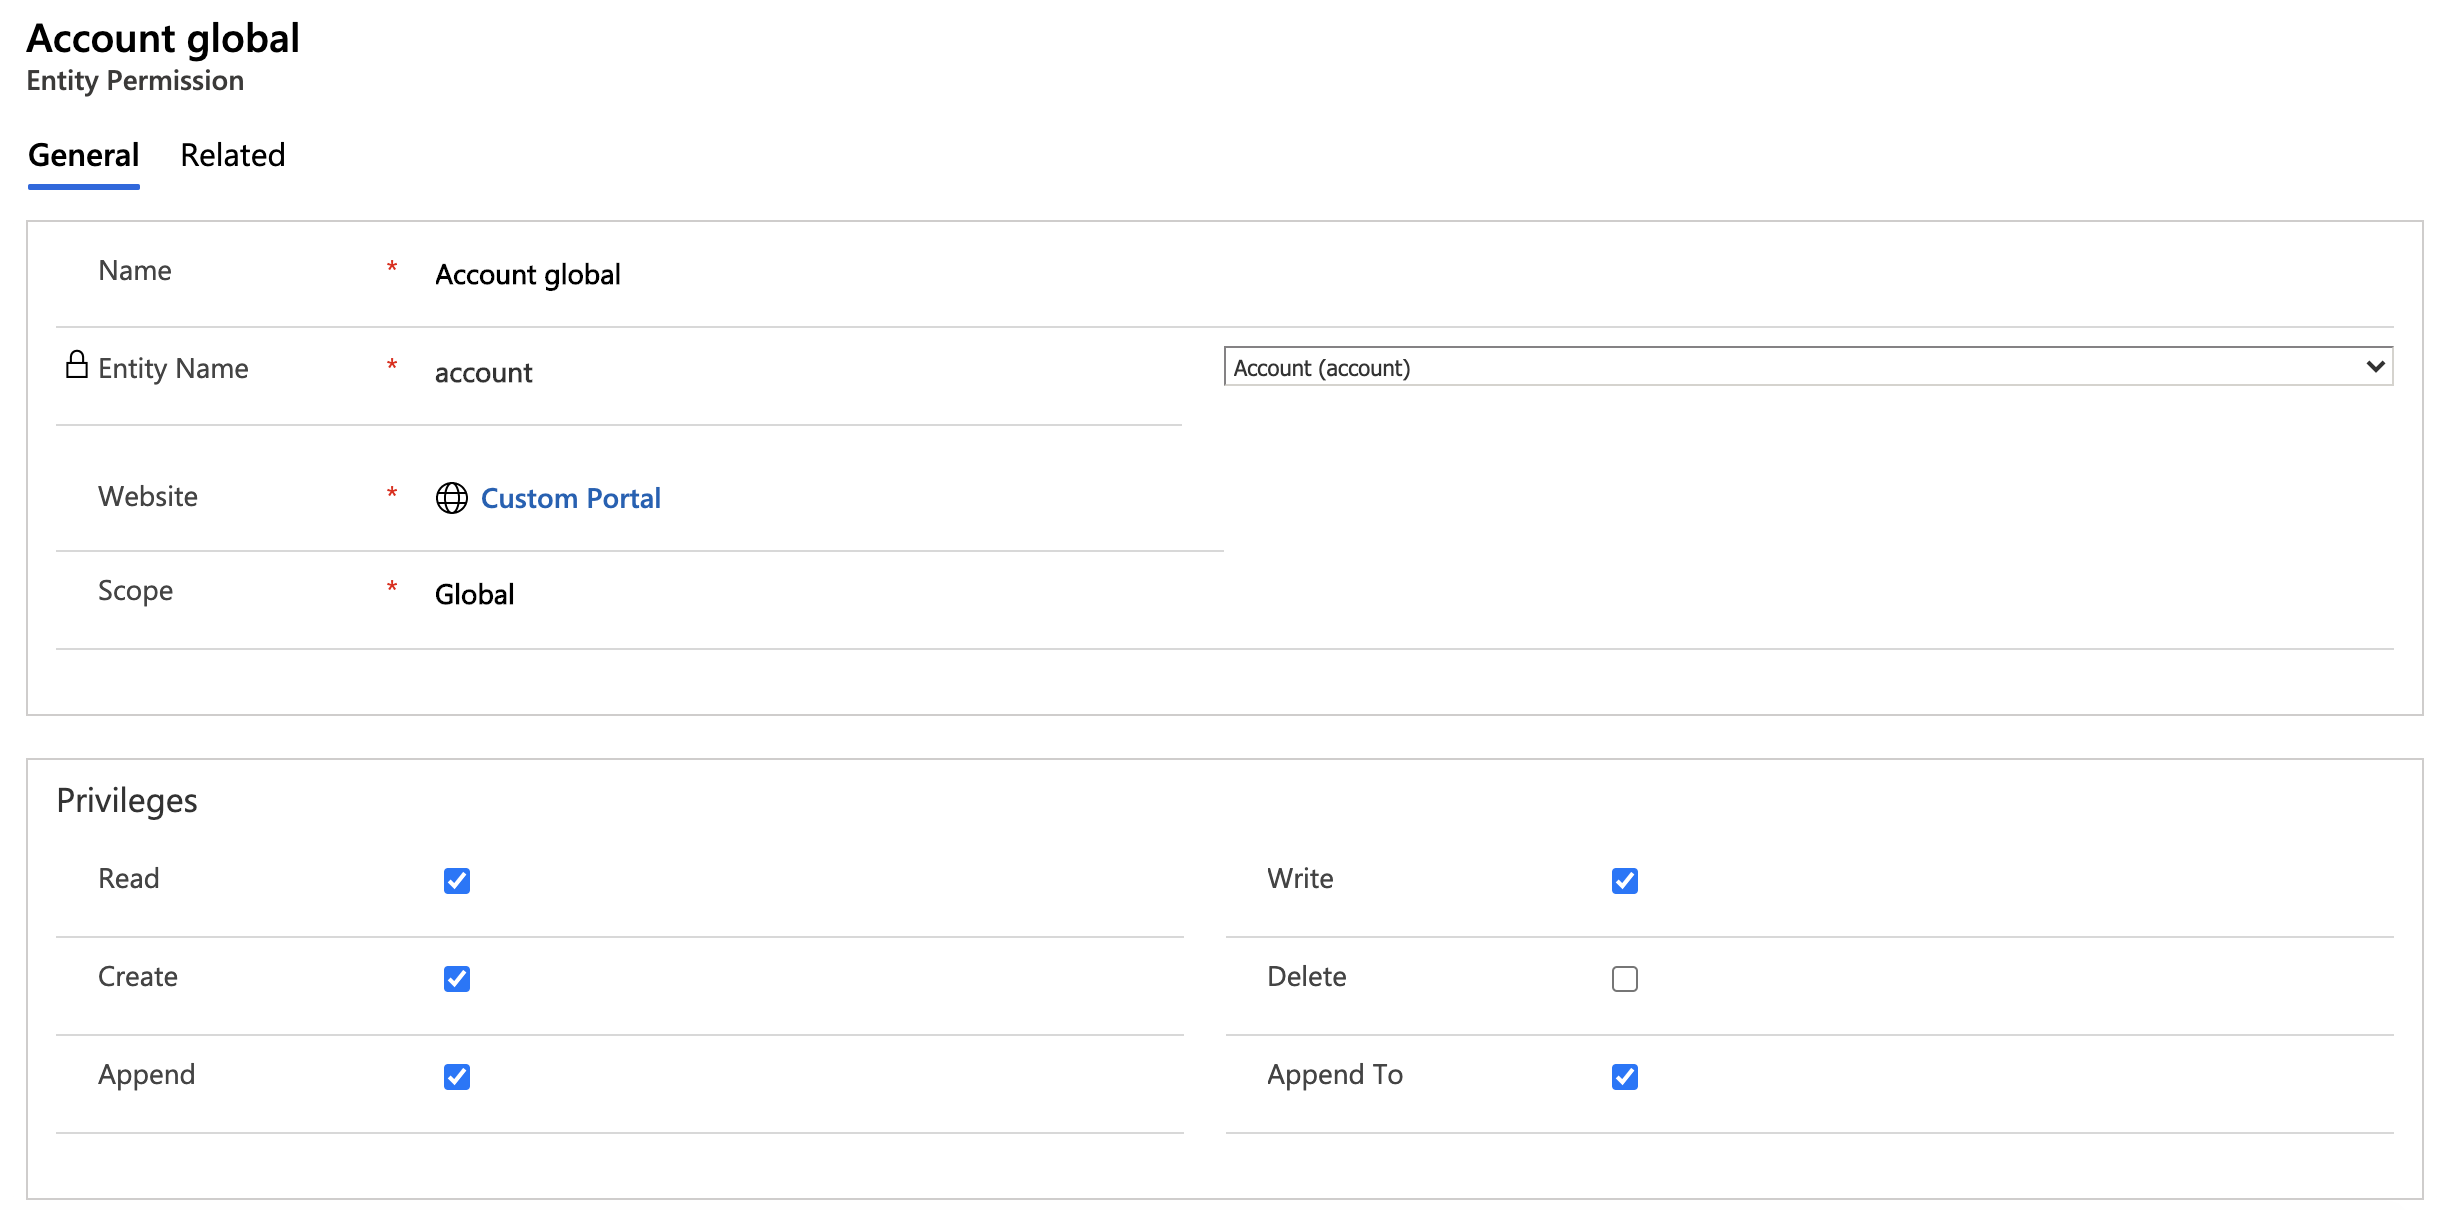
Add your role there, I am adding the administrator role.
So right now, everything is set up for our environment, I will perform the known Portals Cache refresh, and we will start to code.
If you want some reference from the docs just visit the url:
Portals Web Api OperationsSo let’s start saying that you will need to include some Javascript in order to perform your actions much faster. There is some code from Microsoft that will really help you. In my header I have set the following:
$(document).ready(function() {
    (function(utilities, $) {
        function getParameterByName(name) {
            var match = RegExp('[?&]' + name + '=([^&]*)').exec(window.location.search);
            return match && decodeURIComponent(match[1].replace(/\+/g, ' '));
        }

        function safeAjax(ajaxOptions) {

            var deferredAjax = $.Deferred();

            shell.getTokenDeferred().done(function(token) {

                // add headers for AJAX
                if (!ajaxOptions.headers) {

                    $.extend(ajaxOptions, {

                        headers: {

                            "__RequestVerificationToken": token
                        }
                    });
                } else {

                    ajaxOptions.headers["__RequestVerificationToken"] = token;
                }
                $.ajax(ajaxOptions)
                    .done(function(data, textStatus, jqXHR) {

                        validateLoginSession(data, textStatus, jqXHR, deferredAjax.resolve);
                    }).fail(deferredAjax.reject); //AJAX
            }).fail(function() {

                deferredAjax.rejectWith(this, arguments); // on token failure pass the token AJAX and args
            });

            return deferredAjax.promise();
        }
        utilities.safeAjax = safeAjax;
        utilities.getParameterByName = getParameterByName;
    })(window.utilities = window.utilities || {}, jQuery)
})
⭐ Why I have done this? Well, this is just a personal option, but I like to have this utilities in the header and the take them as I want, because they are going to be used across many webpages. I am leaving here my getParameterByName function that will get the Parameter you want from the function, I use this a lot, and probably you want that. In order to use them, you only have to say:
var myid = utilities.getParameterByName("id")
or
utilities.safeAjax() ...
Then, let’s create our quick WebTemplate to perform the FetchXML to show up the result.
{% fetchxml Axazure %}
<fetch version="1.0" output-format="xml-platform" mapping="logical" distinct="false">
<entity name="account">
<attribute name="name" />
<attribute name="description" />
<attribute name="telephone1" />
<attribute name="accountid" />
<attribute name="address1_city" />
<order attribute="name" descending="false" />
<filter type="and">
<condition attribute="name" operator="eq" value="Axazure" />
</filter>
</entity>
</fetch>
{% endfetchxml %}
{% for item in Axazure.results.entities %}
Name: {{item.name}}
Description: {{item.description}}
Telephone: {{item.telephone1}}
City: {{item.address1_city}}
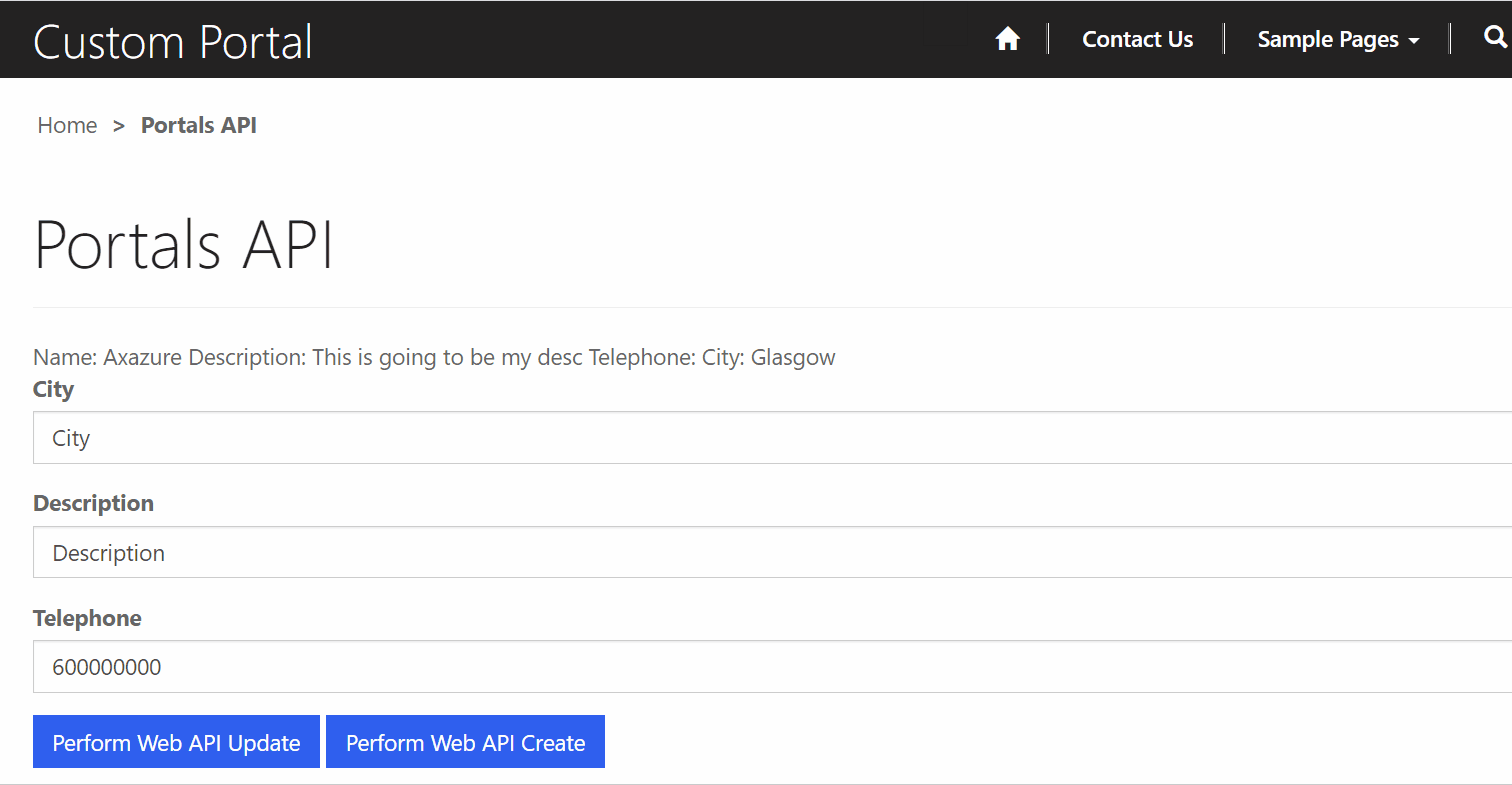
{% endfor %}In our webpage, let’s go inside the Content Page. I have created one called PortalsApi
🔥 As you know, the Content Page will be the one you need to use to create and update your HTML, JS and CSS.
💰 If you have some issues when loading webpages, disable the AdBlock you are using.
Inside the HTML let’s put:
{% include 'FetchXMLMyAccount' %}
<div>
    <div class="form-group">
        <label for="name">City</label>
        <input type="text" class="form-control" id="city" placeholder="City">
    </div>
    <div class="form-group">
        <label for="description">Description</label>
        <input type="text" class="form-control" id="description" placeholder="Description">
    </div>
    <div class="form-group">
        <label for="telephone">Telephone</label>
        <input type="text" class="form-control" id="telephone" placeholder="600000000">
    </div>
</div>
<div>
    <button type="button" class="btn btn-primary" onclick="OnClickUpdate()"> Perform Web API Update</button>
    <button type="button" class="btn btn-primary" onclick="OnClickCreate()"> Perform Web API Create</button>
</div>
and inside the Javascript let’s write (I am doing some cheating, since I am setting directly the GUID of the record to update so I can go faster, but you can take it from the parameter in the URL)
function OnClickUpdate() {
    var accountid = "f3c2d607-f830-eb11-a813-002248006bf5";
    var jsonObject = {
        "address1_city": $("#city").val(),
        "description": $("#description").val()
    }
    UpdateMyEntity("accounts",accountid, jsonObject);
}

function OnClickCreate() {
    var jsonObject = {
        "address1_city": $("#city").val(),
        "description": $("#description").val()
    }
    CreateMyEntity("accounts", jsonObject);
}

function UpdateMyEntity(entitynameplural, guid,jsonobject) {
    utilities.safeAjax({
        type:"PATCH",
        url:"/_api/" + entitynameplural + "(" + guid + ")",
        contentType: "application/json",
        data: JSON.stringify(jsonobject),
        success: function(result) {
            window.location.reload()
        },
        error: function(XMLHttpRequest, textStatus, errorThrown) {
            alert(XMLHttpRequest.responseJSON.error.message)
        }
    })
}

function CreateMyEntity(entitynameplural,jsonobject) {
    utilities.safeAjax({
        type: "POST",
        url: "/_api/" + entitynameplural,
        contentType: "application/json",
        data: JSON.stringify(jsonobject),
        success: function (res, status, xhr) {
            alert("The id created is: " + xhr.getResponseHeader("entityid"));
        }, error: function(XMLHttpRequest, textStatus, errorThrown) {
            alert(XMLHttpRequest.responseJSON.error.message)
        }
    });
}
Now, let’s see what happens if I perform an onClick event in our Update Button.
🔑 Notice that I have put that reload in order to load my page again to reload the FetchXML.
Site Setting for Update


Wohoo! It is working! Now, let’s go removing the city from the Site Settings where the field is:
Let’s perform another Update of the same record, as we did before, now it should fail in the city field. Site Setting for Update


—
Now, let’s do a create with the city and the description.
Site Setting for Creation

So it fails as well! Let’s do another thing, let’s add again to the Site Settings the address1_city.
Site Setting for Creation
It works! So we can create the entity with the fields you set in the Site Settings, if not, it will fail.
With that said, I think it is time for you to play with it and check it!
Conclusion
As you have seen, this is a huge huge huge improvement for all the Portals people that have been struggling before this feature appeared. I strongly believe many good changes will come to solve problems such as the Portals Cache. At the moment, let’s play with it, and enjoy all this transition to better stuff that Microsoft is developing. Let me know if you have any question or any suggestions. Feel free to send me a message to me@victorsolaya.com.