Custom Portals Notes Handler
How many times you had the need to add a note in your Portals and you had to go through the typical:
- Assign the entity permissions
- Create an entity form
- Create an entity metadata form
- Do something for that terrible ui interface the notes provide.
You know what I am talking about… This!

And then…
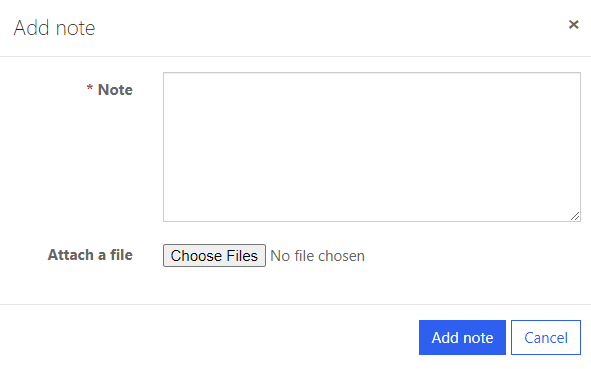
So…what if I tell you there is a way (no documented), in which you could handle the add note and delete note? Of course, there is an edit one, but I would like just to stick to these ones as they are the most common ones.
Code
I am going to give you the code right here and I am not going to guide you through this, the only thing I am going to comment out is the fact, that this code needs to be in a web template.
Why? Simple. We are using liquid to get the website id, this is needed to use the URL to add or delete notes.
For this code purpose, I am adding notes to the contact or deleting notes from it. Just you to be aware, the first step I told you before (the entity permissions for adding,deleting, appending notes) needs to be set as well.
<!-- Code for selecting the input and put and input for setting the id to be deleted-->

<div class="container">
  <div class="row">
    <label for="myFile">Select your file to upload: </label
    ><input type="file" id="myFile" onchange="addNote('myFile')" />

    <label for="myFileToDelete">Id annotation to be deleted: </label>
    <input type="text" id="myFileToDelete" /><button
      type="button"
      onclick="deleteNote('myFileToDelete')"
    >
      Delete note
    </button>
  </div>

  <!-- Entity form just for demo purposes--->

  <div class="row">
    {% entityform name:"NotesForm" %}
  </div>
</div>

<script>
  ///URLS to be adding or deleting the note
  var urlAddNote = "/_services/entity-form-addnote/{{website.id}}";
  var urlDeleteNote = "/_services/entity-form-deletenote/{{website.id}}";

  //Action for deleting the note

  function deleteNote(attachId) {
    var annotationId = $("#" + attachId).val();
    var jsonannotationdelete = '{"id":"' + annotationId + '"}';

    return shell
      .ajaxSafePost({
        type: "POST",
        contentType: "application/json",
        url: urlDeleteNote,
        data: jsonannotationdelete
      })
      .then(function(result) {
        alert("This has been deleted");
      });
  }

  //Action for adding the note

  function addNote(idFileInput) {
    var file = $("#" + idFileInput)[0].files[0];
    var formData = new FormData();
    formData.append("regardingEntityLogicalName", "contact");
    formData.append("regardingEntityId", "{{user.id}}");
    formData.append("text", file.name);
    formData.append("isRequired", "");
    formData.append("attachmentSettings", "");
    formData.append("file", file);

    shell.getTokenDeferred().done(function(token) {
      formData.append("__RequestVerificationToken", token);
      shell
        .ajaxSafePost({
          url: urlAddNote,
          method: "POST",
          data: formData,
          contentType: false,
          processData: false
        })

        .then(
          function(correct) {
            alert("Everything was correct");
          },
          function(error) {
            alert("There was an error: ", error);
          }
        );
    });
  }
</script>
🔥 TIP: If you add an entityform with its notes, you can check how the attachmentSettings is provided, you can copy and paste that and put yours in the code, same as isRequired.
The only thing I am going to explain here is the fact that we are doing an ajax post query against those services that are available for us.
For the delete note function, you need to provide a JSON as you see, with the id of the annotation.
I made an example here in which you can see I am adding the guid of the annotation that I am taking by hand, and I am deleting with a button that is doing my stuff as you can see.
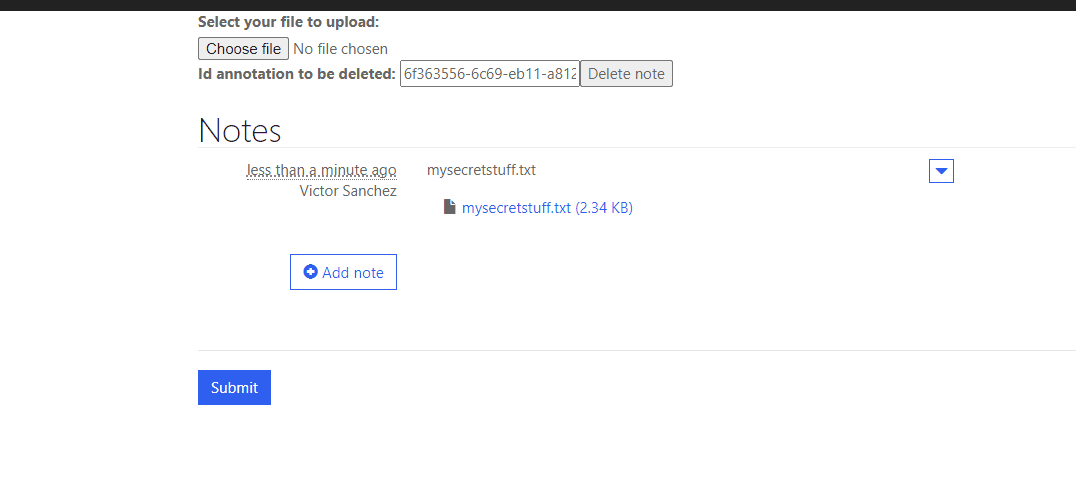
On the other hand, we have the form data, that is just like a ”
” but in a manual way, in which we are sending the regarding entity this is going to be set, the file name, and the actual file taken from the input type=file.
Easy peasy, right?
Conclusion
That’s the whole post. I didn’t want to take too much time to explain this because is straight forward but I believe it is going to be quite useful for all the developers out there that are not aware you can do something for not using that ugly UI that I showed you before.
Any suggestions or question, feel free to send me an email to: me@victorsolaya.com
By the way!
If you are not aware, I am going to give a session about Portals + Stripe + Microsoft Teams + Power Automate for the Scottish Summit, you are invited for that. Grab your ticket and attend my session, it will be awesome!